During the UK’s seemingly interminable 2021 lockdown I’ve been playing a lot Elder Sign - a co-operative board game steeped in Lovecraftian lore. The aim of the game is to defeat Cthulhu or another eldritch antagonist by choosing which of a small selection of adventures to attempt each turn. Adventures can be succeeded or failed and each result brings either rewards or penalties. At first glance this seems similar to the multi-armed bandit problem where each adventure is equivalent to a different arm. Unlike the bandit problem each adventure is represented by a physical card which is face up and contains information on the difficulty, rewards and penalties of the adventure. Also, adventures are replaced when they are completed so there is less of an exploration/exploitation tradeoff.
So if all of the information about these adventures is visible wherein lies the challenge of the game? The problem is that it’s fiendishly difficult to use the printed information to work out exactly how likely you are to succeed an adventure. Determining whether you succeed or fail an adventure involves repeated rounds of rolling non-standard dice, many to one matching of dice results to symbols on the card and multiple places where player actions can affect the result (and more!) which puts it outside the realm of pen and paper combinatorics for mere mortals such as myself. In this blog post I use the Monte Carlo method to quantitatively determine which adventures have the best/worst payoffs and break down the mechanics that determine adventure difficulty.
Elder Sign in a nutshell
In order for this blog post to be interesting, you’ll either need to have played Elder Sign or at least have an outline of how it works and what are the important choices that determine whether you win or lose. There are three important types of object in Elder Sign; Investigators, Adventures and the Ancient One.
NB: Throughout this blog post I consider just the base game and the first expansion (Unseen Forces).
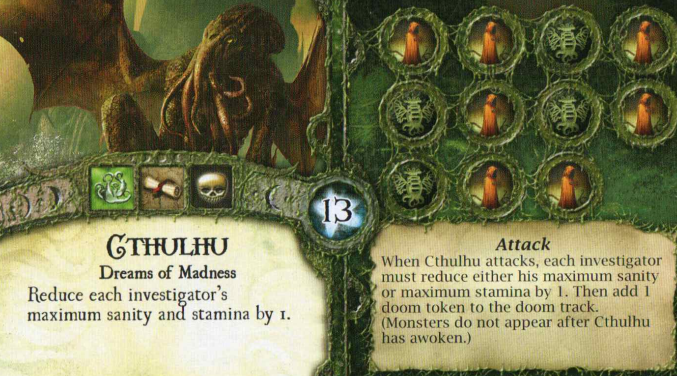
The Ancient One
This is the big bad guy you are working together to defeat, there’s a selection of these with various difficulties including Lovecraft favourites such as Cthulhu and Azathoth as well as some newly invented ones with a similar vibe. A single playthrough involves only a single Ancient One and ends in defeat when the Ancient One acquires a certain number of Doom Tokens. Conversely, the game ends in a victory when a certain number (typically around 10) of Elder Signs are placed on the Ancient One, sealing it away for good. Essentially, Elder Signs and Doom Tokens function as independent victory and loss tracks and you want to maximise the number of the first and minimise the number of the latter. Each of the Ancient Ones has a special ability that impacts the game and a different number of Elder Signs/Doom Tokens required to win/lose - I’ve not attempted to include these points in my analysis.
Investigators and items
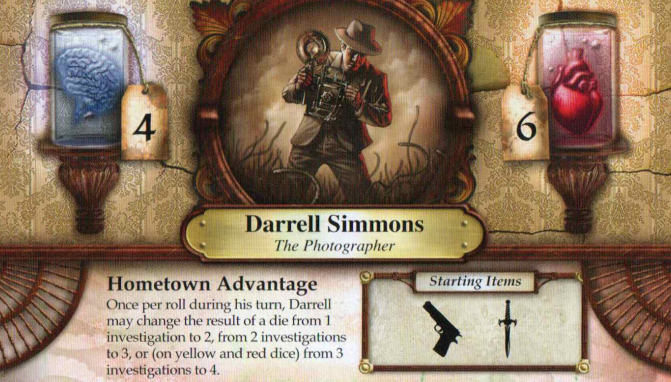
Investigators are the player controlled characters and have two independent “hitpoints”, health and sanity. If either of these reach 0 the character dies and is replaced with a new one - in order for this to have consequences, dieing also triggers a penalty in the form of a Doom Token. Investigators can accumulate items of various kinds throughout the game by completing Adventures, the majority of which are consumables that provide single-use benefits when attempting Adventures. Like Ancient Ones, there’s a large selection of Investigators with differing amounts of health/sanity hitpoints, special abilities and starting items.
Adventures
Each turn, a player choose which of the available (typically between 6 and 9) Adventures to attempt. An Adventure has a bunch of tasks (I’ll get to what these actually are in a moment), all of which must be completed to successfully complete the Adventure. These tasks are visible in advance and taken together determine how difficult it is to succeed at a particular adventure. Each Adventure has a visible, fixed reward for success and a visible, fixed penalty for failure. These rewards and penalties include things such as Doom Tokens or Elder Signs, which directly get you closer to victory or defeat, and items that can be used for advantages in later Adventures. Additionally, when an Adventure is completed it is replaced with another from a deck and the Investigator who completed gets a certain number of Trophy Points that act as currency at an in-game shop.
The “main loop” of the game involves weighing up the Adventures currently on the board, identifying which has the best risk/reward tradeoff and then attempting that one. These sounds simple but as we’ll see in the next section evaluating the success probability of a particular Adventure is non-trivial.
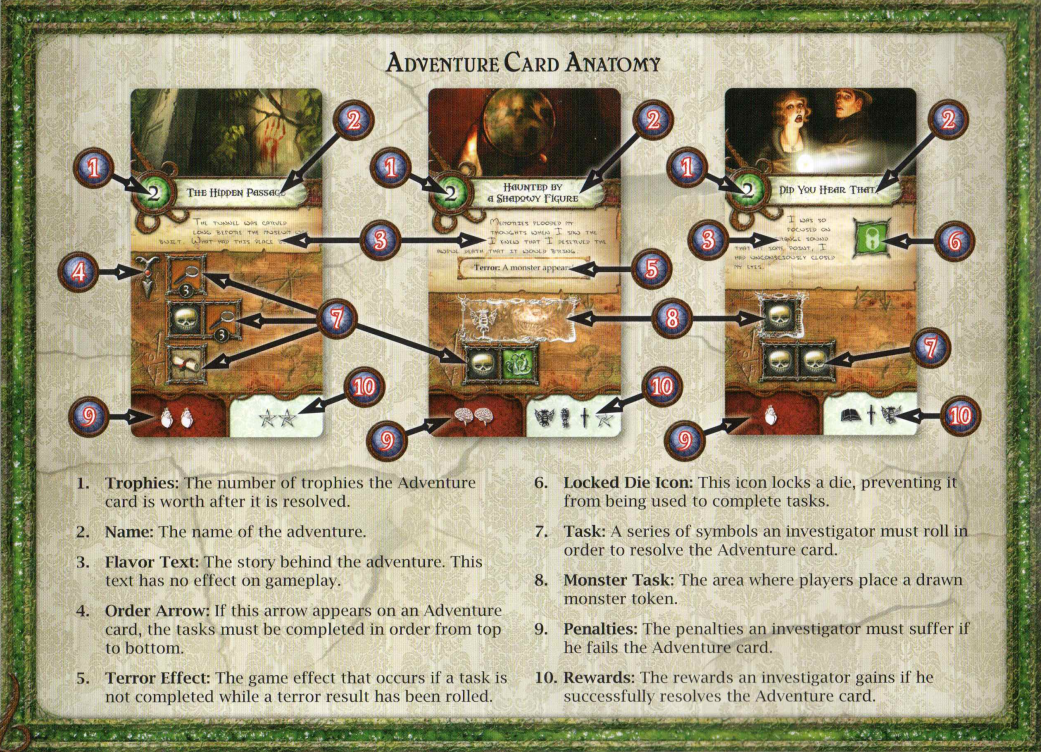
Anatomy of an Adventure
There’s no better way to understand all of this than to look at a few examples and luckily the rulebook has done this for me already.
Attempting Adventures
So how does one actually attempt an Adventure? In a nutshell it involves repeatedly rolling a set of non-standard dice and matching symbols on the dice to symbols on the Adventure card.
Attempting an adventure consists of multiple rounds, at each round you attempt to match the result shown on the dice to any of the tasks (or just the current task if its an ordered Adventure). You finish the attempt when you’ve either run out of dice (failure) or completed all tasks (success).
If you can’t match the result of your roll to any of the tasks you have a few options.
- Use a Clue (a consumable item) to re-roll any number of dice and then check again for matches.
- “Focus” a single dice by setting it aside and not re-rolling it in the next round.
After an unsuccessful round with no matches you must discard a dice of your choice from the dice pool. Both of these options involve some player choice, however in both cases it seems like the obvious choice is to re-roll only the un-matched dice/focus a matched dice. If you fail a round and your result contains a “terror” symbol (looks like some tentacles) then you trigger the Terror effect printed on the Adventure (if any).
If you can match one or more tasks to the result of you roll you must choose one of the tasks to complete by placing the matched dice on the corresponding symbols of the task. Dice used this way are not used in any further rounds of the Adventure and the task is considered complete.
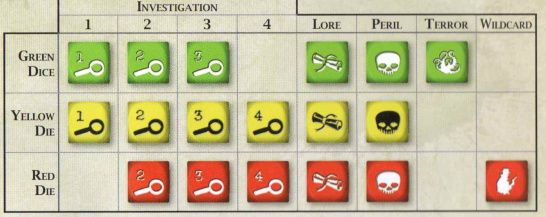
Matching the dice is not entirely trivial. There are three kind of dice with a slightly different set of symbols (see chart below); Lore, Peril and Terror results must be matched 1:1 with task symbols but Investigation results are numbered and can be added together for many:1 matching. The chart below shows the three kinds of dice and what symbols are on each one, note that the yellow and red dice are slightly more valuable than the default green dice.
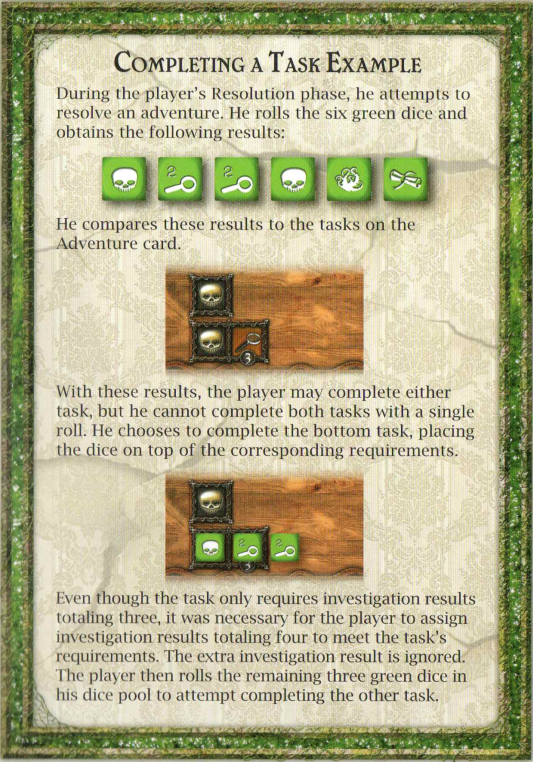
To help solidify this in your mind, here’s an example of completing a task from the rulebook.
If you’re a programmer like me then it will help to see the algorithm for attempting an Adventure as pseudocode.
Expand for pseudocode
```
def attempt_adventure(tasks, dice, clues)
    while len(dice) > 0 and len(tasks) > 0:
        dice_result: List[Symbol] = dice.roll()
        matched_tasks: Dict[Task, Dice] = tasks.match(dice_result)
        if len(matched_tasks) > 0:
            completed_task, used_dice = select_task_to_complete(matched_tasks)
            dice.remove(used_dice)
            tasks.pop(completed_task)
        else:
            if clues > 0:
                # Clues let's
                clue_policy(dice)
                continue

            focus_policy(dice)
            dice.pop()  # Remove one dice

        if len(tasks) == 0:
            return SUCCESS
        else:
            return FAILURE
```
Randomness in adventures
As you can see, adventuring involves a lot of randomness and although the game does include a few opportunities for player choice in attempting an Adventure, the skill cap of these choices is low (there’s an obviously correct action in most cases) and their effect is quite small. As the player has relatively little control over the outcome of an Adventure once it’s started the most important choices are what Adventures to attempt and what consumable items to use for the attempt. Some items grant additional dice to be used during the attempt and these have to be used in advance of the attempt. Clue items can also be used during the Adventure but do not have to be commited in advance. Even though player choice is limited, its still crucial to understand the internals of Adventures in order to estimate success probabilities.
Hopefully you can see why I took a Monte Carlo approach to this problem. Calculating the probability of succeeding a single task given a set of dice is easily achievable with a bit of combinatorics but calculating the success probability of a whole Adventure is much harder. The focus mechanic, the option to do partial re-rolls using Clue items and the possibility of triggering Terror effects all tip the scales in favour of a Monte-Carlo over analytic approach.
Choose your adventures carefully
It’s relatively easy to rank the available Adventures in terms of difficulty using a proxy like the minimum number of dice needed to succeed at an adventure, yet it’s impossible for mere-mortals like myself to work out the concrete success probability of an Adventure in my head. Furthermore, it’s unclear how to assess the relative value of the rewards vs penalties of a particular card and hence completely impossible to put Adventure selection (which is pretty much the entirety of the game) on a quantitative footing. I suspect this design was intentional on the behalf of the game-designers to make it difficult for munchkins like me to metagame too hard. Well, all I can say is that they didn’t try hard enough.
Method - the Monte-Carlo virtual casino
The Monte Carlo method is a computational method for approximating otherwise intractable probability questions that was first developed at Los Alamos for the study of neutron diffusion in nuclear weapons (clearly, this work is just as important). Instead of working out the exact distribution corresponding your answer, you just take repeated samples from it and then estimate the quantity of interest based on those sample. As being able to sample from a distribution is often much each easier than specifying its exact form this represents a drastic increase in the range of problems that can be tackled, especially in our age of very fast computers.
he description of the Monte Carlo method might bring to mind the image of a compulsive gambler repeatedly pullling the lever at a slot machine. In fact this is not far wrong, the namesake of this technique is the Monte Carlo casino in Monaco where Stanislaw Ulam’s uncle would go after borrowing money from relatives.

Technical details
I implemented the core mechanics of Elder Sign in Python (Github). To get the data for this blog post was a simple as setting running simulations of Adventure attempts for each Adventure card under a range of scenarios (i.e. number of dice/clues available). I recorded the success/failure of each attempt + a before/after snapshot of the board state as parquet files. If you’re a pandas user I’d strongly recommend serialising your dataframes as parquet instead of csv, in my case this reduced the storage of the raw results data from 3.5GB to ~0.5GB.
Due to the embarassingly parallel nature of Monte Carlo I was able to get a linear speedup proportional to the number of processors on my machine by using the Python multiprocessing library to assign each core to run simulations independently. On my Ryzen 3950X (16C/32T) I was able to run 8192 attempts for each Adventure/scenario (98*11) pair in just over 3 minutes.
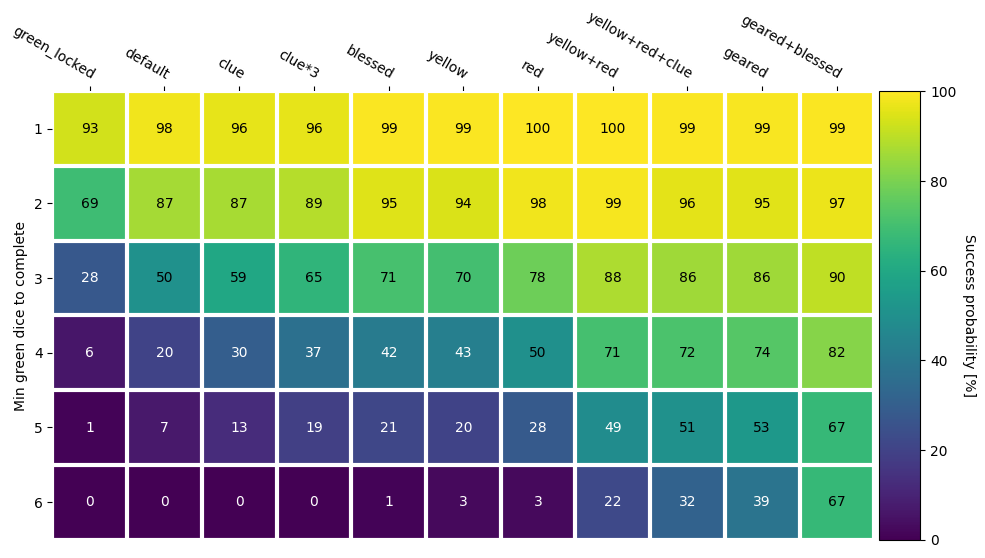
The scenarios I simulated are listed below and span from a weak board position (green dice locked) to a very strong board position (geared + blessed). This is not an exhaustive range of scenarios but I’d say about 99% of board positions in a particular playthrough will fall in this range.
| Scenario | Green Dice | Yellow Dice | Red Dice | Clues |
|---|---|---|---|---|
| Green Locked (cursed) | 5 | 0 | 0 | 0 |
| Default | 6 | 0 | 0 | 0 |
| Blessed | 7 | 0 | 0 | 0 |
| Yellow | 6 | 1 | 0 | 0 |
| Red | 6 | 0 | 1 | 0 |
| Yellow+Red | 6 | 1 | 1 | 0 |
| Clue | 6 | 0 | 0 | 1 |
| Clue*3 | 6 | 0 | 0 | 3 |
| Geared | 6 | 1 | 1 | 1 |
| Geared+Blessed | 7 | 1 | 1 | 3 |
Assigning values in Elder Sign equivalents
Once I’d acquired this raw data there was a single missing step - converting the diverse rewards/penalties into a single scalar value. To do this I treated acquiring an Elder Sign as having a value of 1 and rescaled all other rewards/penalties around that. The base game (before expansions) used to let you exchange 10 trophy points for an Elder Sign but this was removed for being too easy (and also a boring mechanic as it let you grind easy, low-risk adventures only and still win). Hence I’ve set the value of a trophy point as 1/12 Elder Sign equivalents (ESEs). The shop lets you exchange trophy points for various items and I use the rates in the shop to fix the value of items against trophy points.
I’ve also assigned a value to having a red/yellow dice that to incorporate the opportunity cost of spending an item to get a red/yellow dice when attempting an adventure. This is important as otherwise this analysis would always recommend spending all of your items on adventure to boost your success probability, even for already easy adventures where the marginal success probability improvement might not be worth spending an item.
| Object | Value (ESEs) | Comment |
|---|---|---|
| Elder Sign | 1 | Reference point |
| Doom Token | -1.1 | Slightly worse than an Elder Sign is good as acquiring one sometimes triggers additional negative penalties. |
| Trophy Point | 1/12 | Based on exchange rate in the base game shop |
| 1 Health | 0.75*1/12 | Based on exchange rate in the First Aid Station |
| 1 Sanity | 0.75*1/12 | Based on exchange rate in the First Aid Station |
| Common Item | 2/12 | Based on exchange rate in the shop |
| Unique Item | 3/12 | Based on exchange rate in the shop |
| Spell | 4/12 | Based on exchange rate in the shop |
| Ally | 5/12 | Based on exchange rate in the shop |
| Clue | 1/12 | Based on exchange rate in the shop |
| Blessed status | 8/12 | Based on exchange rate in the chapel |
| Cursed status | -9/12 | Similar effect to Blessed but opposite in direction |
| Monster | -3/12 | Equivalent to a ~1.5 symbol task being placed on an Adventure |
| Red Dice | 3.3/12 | 10% more than a Unique item |
| Yellow Dice | 2.2/12 | 10% more than a Common item |
This approach is reminiscent of material values in chess, where each piece on the board is assigned a numerical value and the total value of the board is just the sum of over all pieces. This analysis is limited in chess, as it doesn’t account for piece position or interaction effects where a set of pieces can be considered more or less valuable than the sum of their parts. Similarly, this analysis is limited for Elder Sign as it doesn’t account for the stage of the game, earlier you care more about items but when you’re within striking distance of victory you will care more about Elder Signs.
Results
Adventures
Difficulties
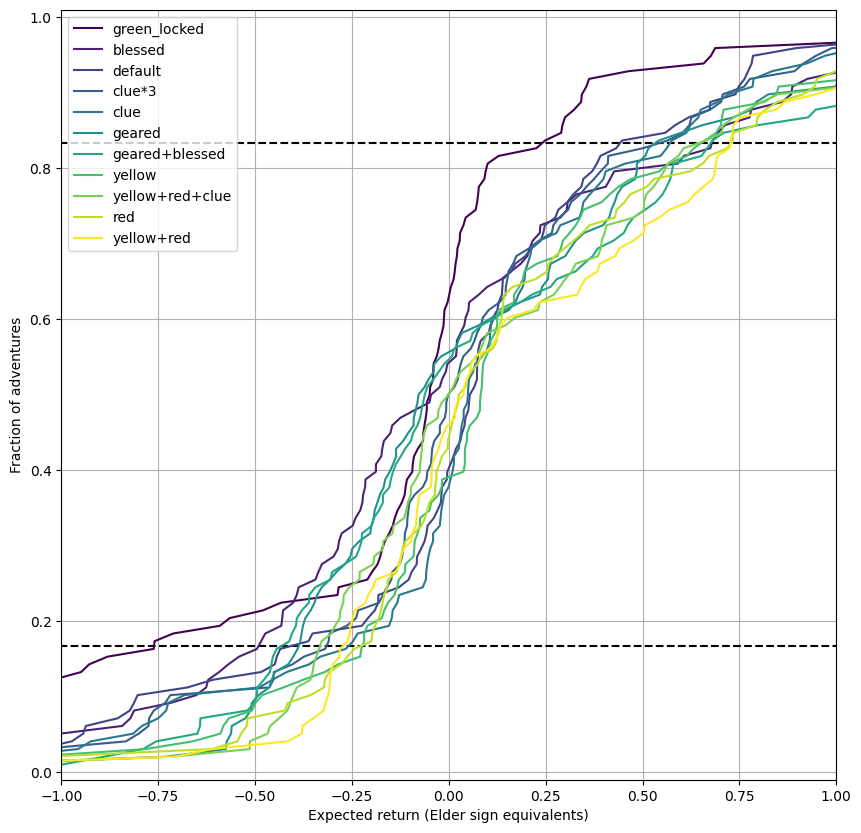
Just how difficult are Adventure cards, what are the hardest and easiest? The chart below shows the cumulative distribution function (CDF) of the Adventure success probabilities under a range of circumstances. In the default, item-free, scenario adventures span from essentially impossible to almost guaranteed success. However, in the strongest scenario even the hardest adventure has about a 35% chance of success.
The dashed lines are the 1/6th and 5/6th percentiles - where you’d expect the hardest and easiest adventure to be in the initial draw of 6 Adventure cards. Players typically start with at least one of an extra red/yellow dice or a clue so I’d expect a board to contain one adventure with an 80% chance of success.
From this chart we can also see the relative benefits of the yellow dice, red dice and clues and can see that clue < yellow < red, just as the 1/2/3 pricing in the shop would suggest.

Green-dice equivalents
The proxy I use for card difficulty while playing the game is the minimum number of green dice required to complete a task AKA green-dice-equivalents or GDEs for short. This is easily calculated as three times the total number of non-investigation symbols on an Adventure plus the number of investigations, all divided by 3.
It turns out that GDEs are a relatively good proxy for Adventure difficulty - the chart below shows the success probability in the default, no item, scenario vs the GDE value of Adventures.
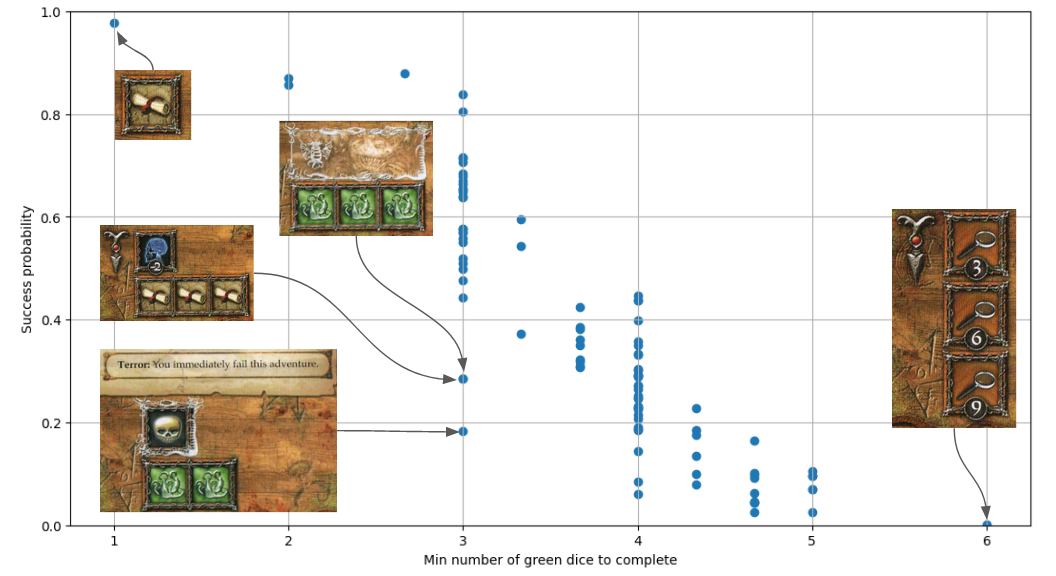
The trend is not quite monotonic, with a Spearman’s coefficient of 0.88, but it’s pretty good! The outliers from this trend illustrate some of the other factors that influence Adventure difficulty. I’ve annotated the chart with the task requirements of these outliers.
There are three adventures with a GDE of 3 that are much hard then the trend. Something Has Broken Free (P(success) = 0.18) is an ordered adventure so you can only match dice to the topmost incomplete task and also has a terror effect (triggered on failing a task while your dice roll shows a terror symbol) that causes you to fail the adventure entirely! You become that which you fear most and Ominous Portents (both P(success) = 0.29)
have no unusual effects but each have a task requiring three dice to be matched simultaneously. As I’ll show in the next section the concentration of symbols within tasks is an important factor in card difficulty.
On the flipside, the outliers on the easy side tend to have non-concentrated task symbols or are composed of mostly Investigation symbols which can be matched in multiple ways.
Factors influencing Adventure difficulty
We’ve seen that the green-dice equivalent is a simple yet fairly good proxy for Adventure difficulty, what other factors influence difficulty and what rules can we discern?
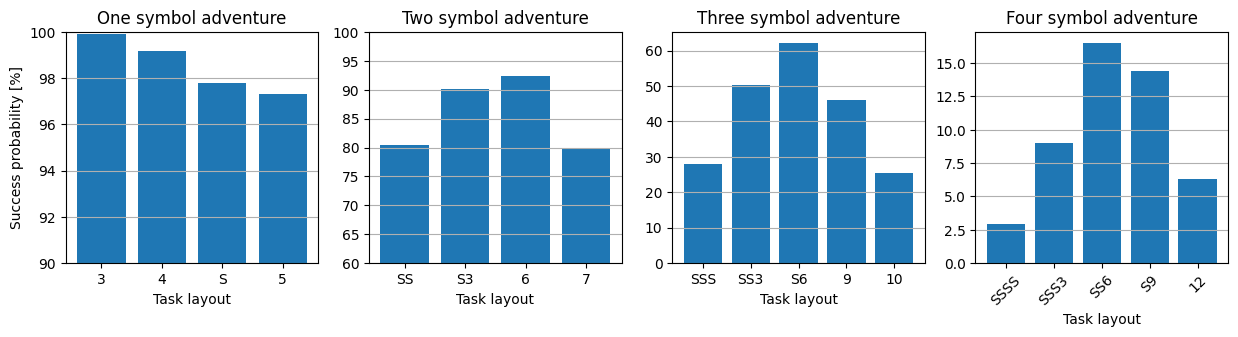
To make this section I simulated various task layouts 1 million times each in the default no-item, 6 green dice scenario to determine their success probabilities. I’ve developed a shorthand for task layouts with the following rules:
Sdenotes a non-investigation symbol- A number denotes an investigation symbol with a particular value
/separates tasks
Note that we don’t need to distinguish between symbols in the default scenario as they are all equally likely on the green dice.
More concentrated tasks are harder
An Adventure has more “concentrated” tasks if more of the symbol requirements are located in a single task. In general, if two Adventures contain the same number of symbols, the one with the more concentrated tasks is harder. This rule holds for almost all printed cards with the exception that SS/S and S/S/S are about equally hard. Also, S/S/S/S is harder than SS/S/S but no Adventure with tasks of the form S/S/S/S is printed anywhere (in the expansions I have).

Investigations are easier than other symbols but a mix is easier still
The following charts show the success probability of a single task (default, no-item scenario) of a particular format and illustrate the effect of changing the mix between Investigations and other symbols. The leftmost chart says that a task with one symbol is about equivalent in difficult to an Investigation with value 5. The second chart shows that two symbols are about equivalent to an Investigation with value 7. However, a mix of symbols is easier still as an S3 task has about half the chance of failure as an SS task. The third and fourth charts show the same trend as the second and both demonstrate that one symbol is worth about 3.5 Investigations.
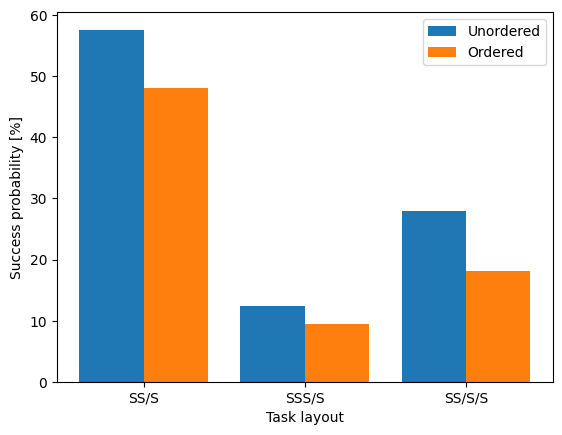
Ordering drops your chance of success by ~25%
Ordering makes less difference than I thought and drops your chance of success relative to an unordered adventure by between 15 and 35% depending on task layout. It has a bigger effect the more symbols are in the adventure and the more tasks the adventure is made of.
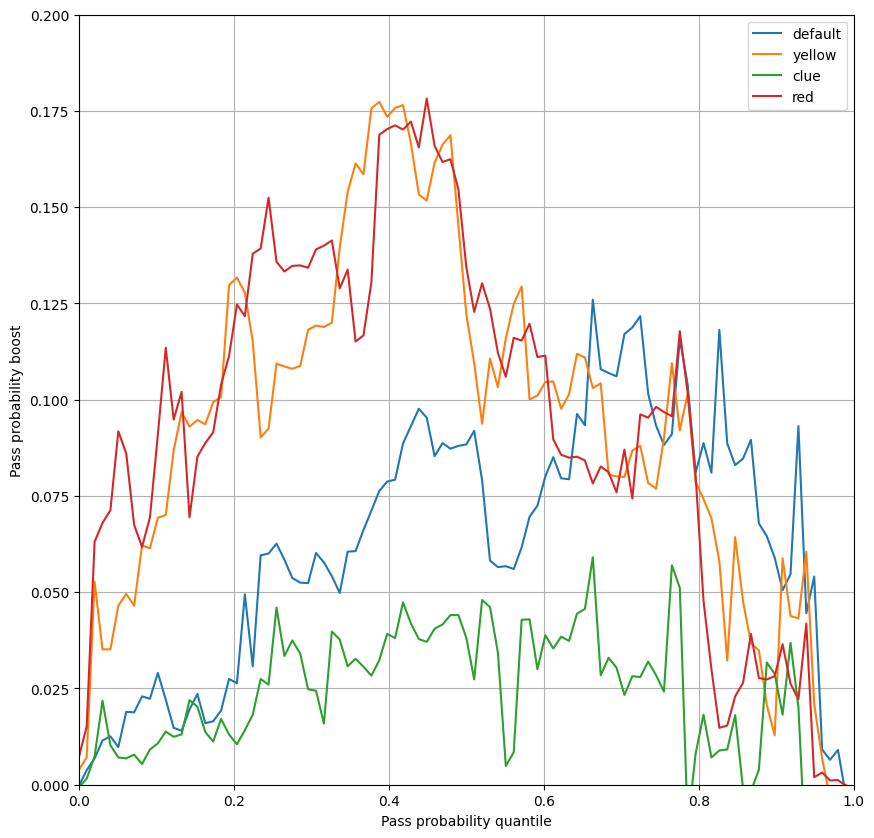
Focusing is a big deal
Focusing is a mechanic that lets you “freeze” a dice after an unsuccessful task attempt so it is not re-rolled in the next attempt - this let’s you make partial progress towards a task by choosing to keep a single useful dice result. It’s fiendishly difficult to work out the effect of this using combinatorics.
The chart belows shows the increase in pass probability due to focusing for some common item scenarios and all Adventure cards. The x-axis is the difficulty rank of an Adventure and the y-axis is the increase in probability for the Adventure at that rank. The effect is quite significant, especially for scenarios where an additional red or yellow dice is available. It’s less significant for the scenario in which a Clue item is available, presumably because the effect of a Clue is like a much more powerful version of focusing, as you get to freeze the result of an arbitrary number of dice instead of just one.
Expected returns on Adventure attempts
Now that we’ve got a good handle on what our chances of success are when attempting Adventures we can start to draw some conclusion about which particular adventures have positive or negative expected returns in different scenarios. The chart below shows the CDF of the expected return in Elder Sign equivalents (ESEs) of all 98 Adventure cards for a range of different item scenarios. The dashed lines are 1/6th and 5/6th percentiles - about where you’d expect the best and worst Adventure in a draw of 6.
The first thing that stands out to me is that a lot of the CDF is in the positive expected return region, for all scenarios. This tells me that most of the time there will be a positive expected return Adventure (if you can identify it) and this agrees with my anecdotal experience that the game is a little easy with ~75% of games ending in victory.
The unintuitive part of this chart is that the scenarios with the most items do not always have the best expected returns due to the opportunity cost of spending those items. In fact, the scenario with arguably the best returns is spending items to get just the yellow and red dice.
Best adventures
TODO: paste this table into a public Google Sheet Using these expected returns I’ve created a (num cards * num scenarios) table that in principle could be used to play the game. An interesting experiment to validate this analysis would be to play a bunch of games making decisions intuitively vs picking use the highest expected returns from this table and seeing which has a higher win rate.
However this table is quite verbose and the most interesting parts are just the top and bottom of the distribution. The expected returns of Adventures vary with the items you have so to collapse the table into a single ranking I’ve taken the average expected return over what I (anecdotally) consider to be the most common item sets you’re likely to have over the course of a game. In order of increasing strength these are default (no items), clue, yellow, red, and yellow+red.
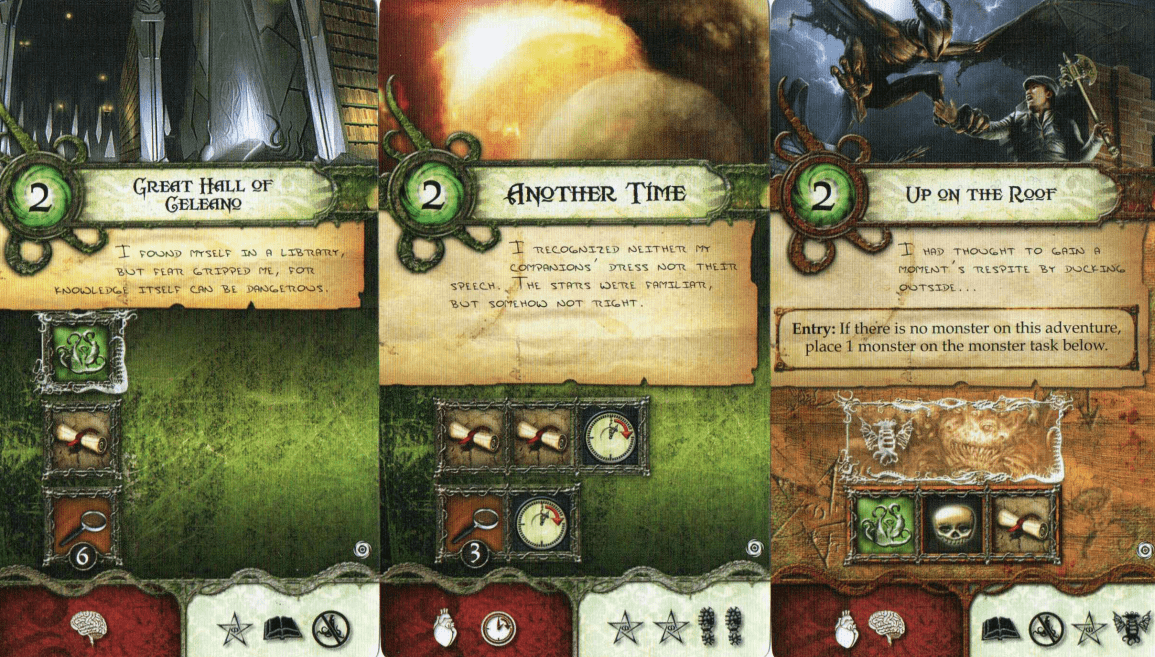
1. Great Hall of Celeano
- P(success | default) = 0.44, E[return | default] = 1.10
- P(success | yellow+red) = 0.90, E[return | yellow=red] = 2.02
The rewards on this Adventure are great: +1 Elder Sign, -1 Doom Token and a high value Spell item. It’s also not particularly hard, but the real kicker though is the fact it has basically no failure penalty so it’s safe to attempt with little or no items.
2. Another time
- P(success | default) = 0.64, E[return | default] = 1.27
- P(success | yellow+red) = 0.97, E[return | yellow=red] = 1.78
Two Elder Signs and two clues is a very strong reward for an Adventure with a 2/3rds success rate (even with no items). The penalties and additional costs are mostly clock turns - every 4 clock turns triggers a random, usually slightly negative random effect. I rate the value of a clock turn as being relatively small and negative this so they don’t make this Adevnture a bad choice.
3. Up on the roof
- P(success | default) = 0.55, E[return | default] = 1.11
- P(success | yellow+red) = 0.87, E[return | yellow=red] = 1.64
The rewards for Up on the Roof are the same as Great Hall of Celeano with the addition of a monster, which is a negative valued reward. Monsters are essentially just extra (randomised) tasks that get added to adventures, making them more difficult. However, they come with a trophy point reward which mitigates the negative value. This card is a little easier than Great Hall of Celeano but that doesn’t make up for the worse rewards. Note that I’ve modelled this card with an unfilled monster slot so it would move down the rankings a lot if it was filled.
Worst cards
Similarly, here are the worst adventures - none of these have a positive expected return with any item set!
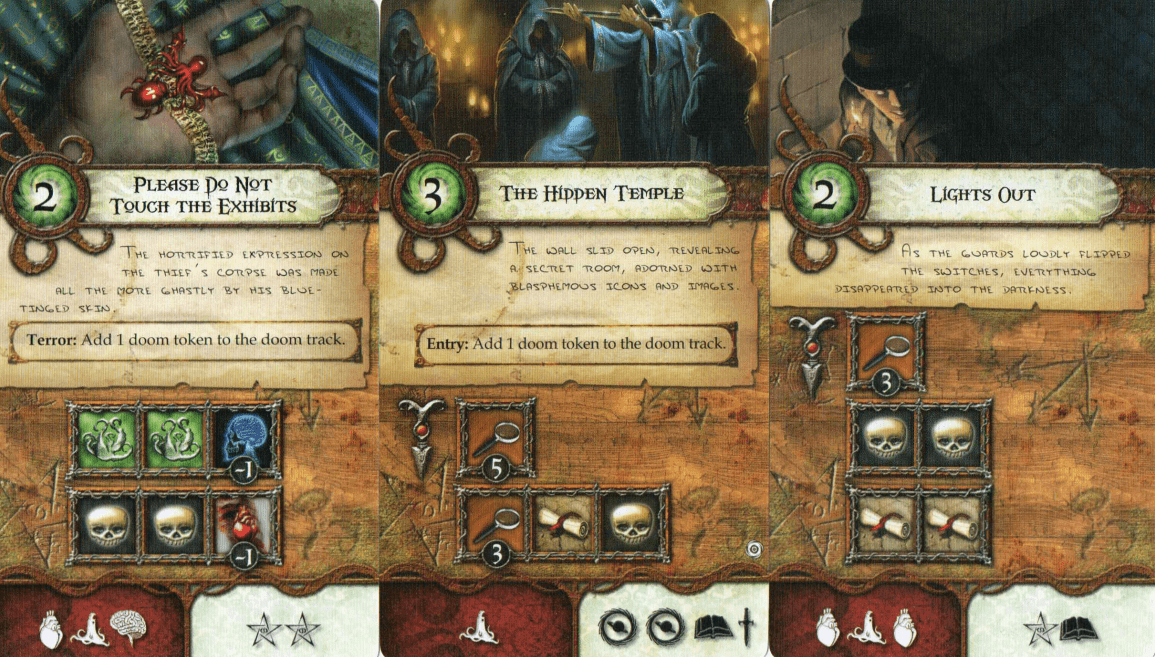
1. Please do not touch the exhibits (worst)
- P(success | default) = 0.23, E[return | default] = -2.37
- P(success | yellow+red) = 0.65, E[return | yellow=red] = -1.13
Don’t be tricked by the high rewards on this card - you’re in for a bad time even with good items. The key to this cards dismal return is it’s terror effect. In fact, with both the yellow and red additional dice (a fairly good situation) you’re likely to trigger the terror effect an average of 1.93 times when attempting this adventure! Even conditional on success you’re still likely to trigger to the terror effect 0.86 times, which is about half of the reward. The fact that this card has guaranteed sanity and health costs just adds insult to injury.
2. The hidden temple
- P(success | default) = 0.09, E[return | default] = -2.02
- P(success | yellow+red) = 0.69, E[return | yellow=red] = -1.15
This adventure has a guaranteed Doom Token on entry, while also being difficult and having a doom token penalty, you don’t need to be a genius to see this one is a bad idea. To be fair I haven’t attempted to quantify the value of the Open Gate (the planet symbol) reward which adds an extra adventure to the board so I’m probably being too harsh on this one. If I assigned some positive value to these rewards then this card would be merely somewhat bad.
3. Light’s Out
- P(success | default) = 0.02, E[return | default] = -1.15
- P(success | yellow+red) = 0.40, E[return | yellow=red] = -0.40
This card is staggeringly hard; its in the top 5 most difficult adventures and even in the most favourable scenario I simulated (all 3 additional dice and 3 clues) there’s still a 1 in 3 chance of failure. As the rewards and penalties are fairly balanced in magnitude the sheer difficulty of this adventure makes it one to avoid.
Conclusion
After a dozen playthroughs and a thorough (but still not entirely complete) analysis you might be wondering whether I would change anything about this game. My one complaint is that since most of the items are consumables that come and go there is little character progression and hence the start of the game feels very similar to the end of the game. It would be very cool if there were more extra hard This analysis only covers the base game and the first expansion (Unseen Forces), from what I’ve read the later expansions address this with the addition of permanent “skill” items that characters can acquire.
I’ve shown that there are some adventures which have objectively worse payoffs (given plausible values for various rewards and penalties), would I re-balance these cards to make them fairer? Actually no. For me, the fun of the game lies in debating which adventure to choose at a particular time. If all adventures had similar expected payoffs then there would be little point in trying to make better decisions.